Small Organizing Bin with Handle Plain Weave

Finished Dimensions: 10cm x 11cm x 14cm
|
Important Notes! |
Skill level: ★★★☆☆
Supply list
- KaGOcraft's 15mm Craft Band
- Gorilla Wood Glue
- Scissors
- Clips or Clothespins
- Starter tool kit
Prepare the Craft Band 15mm for this project
Color A: Main Color of the Basket (Pastel Marron Total 1164cm)
Color B: Accent Color of the Basket (Pink Total 95cm)
| Name | Length | Pieces | Width | Color | |
| 1 | Horizontal strip | 24cm | 4 | 12 | A |
| 2 | Horizontal strip | 52cm | 3 | 12 | A |
| 3 | Horizontal strip | 46cm | 1 | 12 | A |
| 4 | Support strip | 11cm | 2 | 12 | A |
| 5 | Vertical strip | 40m | 9 | 12 | A |
| 6 | Reinforcement strip | 14cm | 2 | 12 | A |
| 7 | Weaving strip | 75cm | 4 | 12 | A |
| 8 | Weaving strip | 75cm | 1 | 12 | B |
| 9 | Weaving strip | 47cm | 2 | 12 | A |
| 10 | Inner Rim strip | 77cm | 2 | 12 | B |
| 11 | Outer Rim strip | 79cm | 2 | 12 | B |
| 12 | Handle Lacing strip | 90cm | 2 | 2 | A |
Procedure

1.Make the base. Arrange Horizontal strips 1, 2, & 3 as shown. Place the shortest horizontal strip in the middle. Make sure that all of the strips are centered. Glue the Support strips along both sides as shown.
2.Turn over, and glue Vertical strips along both sides as shown. Make sure they are centered.
3.Flip back to the front side. Take two of the vertical strips and weave as shown, alternating over and under then push out to either side.

4.Weave the remaining vertical strips as shown.

5.Glue the Reinforcement strips along the top and bottom as shown.
6.Fold all strips upward as shown.
7.Take a weaving strip and place the end behind the second vertical strip and secure with a clip or clothespin. Weave alternately, use clothespins to help keep in place.
8. Slightly fold corners to keep in place.
9. After weaving the first row cut off any excess and glue.
Make sure that the ends are hidden by the vertical strips.

10. Using a new Accent color Weaving strip, start the second row at the 3rd vertical strip on the opposite side of the basket to maintain an even thickness. Weave over and under.

11. Repeat weaving with the remaining Weaving strips as shown, until 4 rows are completed. Gradually pull the vertical strips to tighten the gaps between the rows.
12.Fold the center vertical strips on the sides inward, as shown.
13. Cut off excess as necessary and tuck the ends into the third row from the top. Ends should be unseen.

14. Attach a (9)Weaving Strip as shown at 7.5cm from one end.

15. Weave to the other side then fold the end of the weaving strips around the vertical strip and tuck inside.

16. When the other side is reached, fold the end of the weaving strips around the vertical strip and tuck inside.

17. Repeat for the other side of the handle.

18. Using a (7) Weaving strip, start the 6th row.

19. Weave as shown for handle.

20. For all of the vertical strips on the outside of the top row, fold inward then cut off excess as necessary and tuck the ends into the third row from the top. Ends should be unseen.

21. Place the Inner Rim strip between the 6th row strip and the remaining vertical strips for reinforcement as shown.

22. Inserted Inner Rim strip.

23. For all of the vertical strips in side of the top row, fold outward. 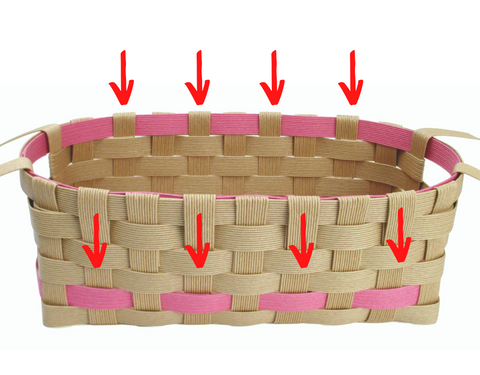
24. Tuck them into 3rd row.

25. By the handle, cut off any excess and apply glue, then tuck the Vertical strips down into the bottom row.

26. Trim one end of the Outer Rim strip to make a point. Insert through every other vertical strip as shown. The weave pattern should be the same as the third row from the top. The end of the Rim strip should be hidden by a vertical strip to maintain a seamless look.
27. Cut off any excess and apply glue as shown.

28. Slip one end of the lashing strip between rims, using glue to secure. Start wrapping around the handle.

29. Try to keep the lashing tight.
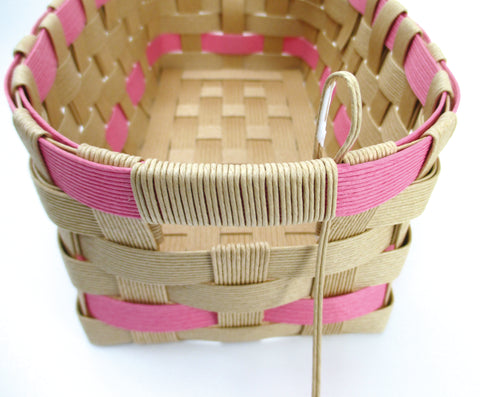
30. Once wrapping has been completed, secure the end with glue on the inside of the handle.

31. Cut any excess. Repeat Steps 28 to 30 for the handle on the other side of the basket.
Finish!!
Any question?
info@kagocraft.com
for more projects here
Ⓒ 2020 Kraftband Ecology Association. All Rights Reserved.